Allow multiple currencies in Magento 2 to improve customers' shopping experience
E-stores do their best to satisfy the needs of their customers to the largest extent, and those based on Magento are no exception. Enabling payments in different currencies provides a whole range of benefits to businesses. This is a great way to speed up decision making and improve the overall usability of a given store. Seeing prices in the currencies they are used to, shoppers will place an order times faster.
In Magento, store admins can manage currencies and their rates right in the Admin panel with almost no effort. We are going to get down to the nitty-gritty of configuring Magento 2 currencies in this tutorial.
Enabling Currencies in Magento
A Magento-driven store can accept currencies from 200+ countries. It’s up to you to decide whether to enable all of them for your clients. The only aspect to take into consideration is the currency exchange rates, as a fluctuation may hit your profit margin.
Currency symbols are displayed in product prices on the front-end, as well as in the store’s sales documents. You may introduce custom symbols at your store if you wish. You may also configure price display for each Store/Store View.
Before setting individual currency rates make sure to set the base currency’s scope.
Selecting Accepted Currencies
Log in to your store’s back-end and go to Stores > Settings > Configuration. To apply settings to a specific Store View, select this View in the upper-right corner of the page.
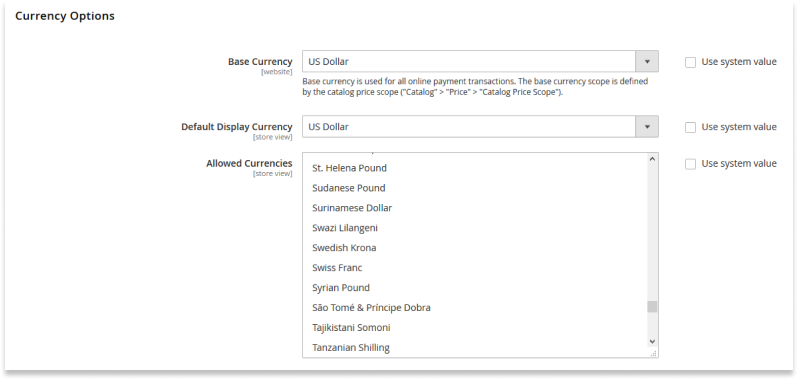
Proceed to the panel on the left and access Currency Setup under General. In the ‘Currency Options’ section, set the ‘Base Currency’ field to the primary currency that you are going to use for online transactions.
Set the Default Display Currency to the one you utilize for displaying pricing in the particular Store View. Then select as many currencies as needed in the ‘Allowed Currencies’ list to enable them as payment in the Store View.

Defining the Base Currency’s Scope
On the left panel, navigate to Catalog > Catalog and then scroll down to ‘Price’ section, expand it and choose the required price scope.

Configuring the Import Connection
The panel on the left comes to play here again. Go to General > Currency Setup on it and expand the ‘WebserviceX' section. Add the number of seconds of inactivity (e.g., 100) you wish to allow before the connection times out.

Managing Scheduled Import Settings
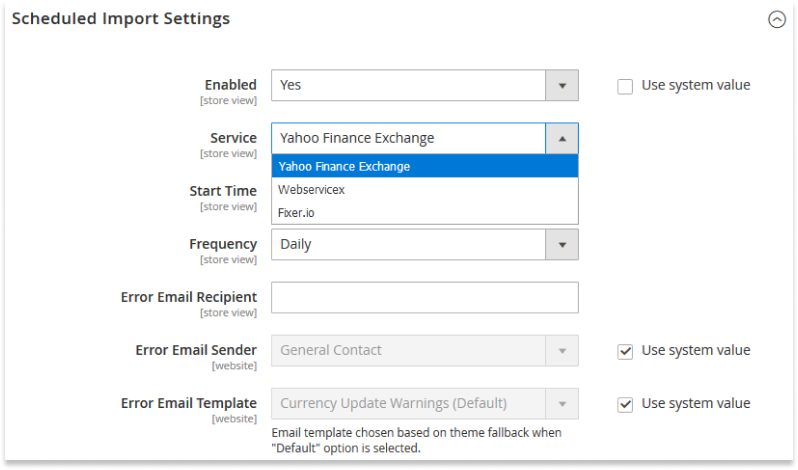
Proceed to the ‘Scheduled Import Settings' subsection, and set the ‘Enabled’ field to ‘Yes’ to allow for automatic currency rate updates. Specify the start time, frequency of updates, add an error email recipient and its sender and select an email template for the email.

Now you can save the configuration and clear the cache.
Managing Currency Symbols
To customize symbols associated with the currencies, go to Stores > Currency > Currency Symbols to see the list of currencies enabled at your store.
In this workspace, you can introduce custom symbols to the currencies. When complete, click the ‘Save Currency Symbols’ button and then clear the cache.

Updating Currency Rates
Currency rates can be updated either manually or automatically on a predefined schedule. We recommend using automatic updates to ensure that you use the latest rates.
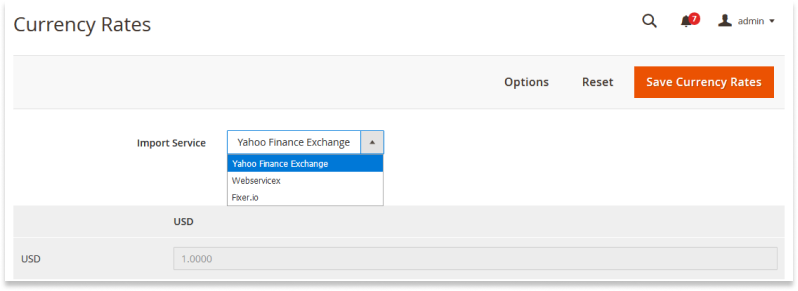
To carry out a manual update, navigate to Stores > Currency > Currency Rates. Select the rate you need to change and enter the new value in the related field. Then save the changes.

To import currency rates, select the currency rate provider in the ‘Import Service’ dropdown and hit the ‘Import’ button. Save the changes and clear the cache to activate the configuration.
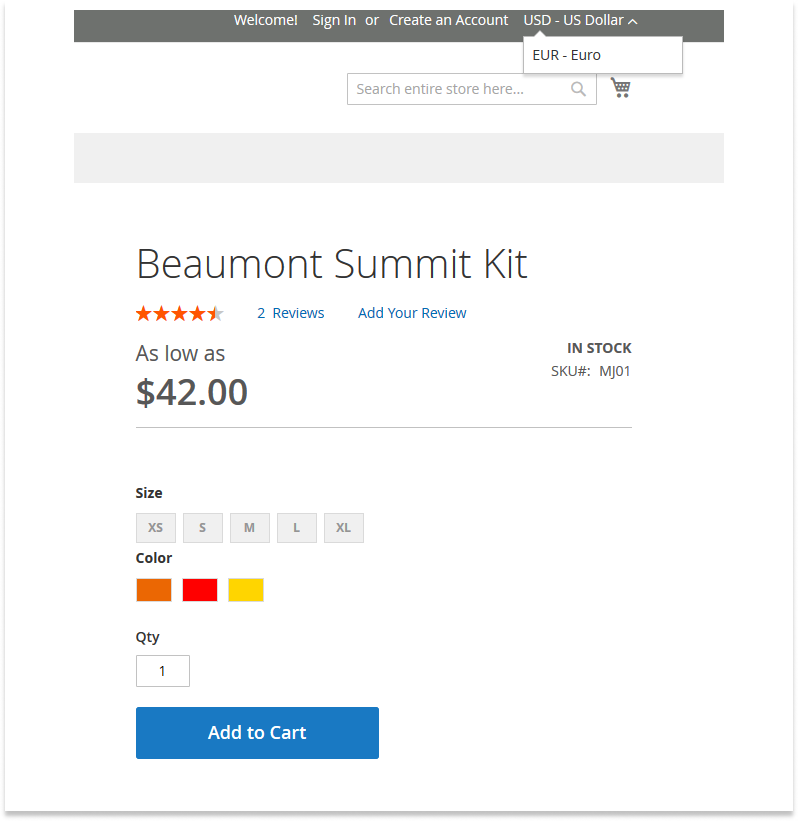
If your Magento store supports multiple currencies, visitors will see a Currency Chooser in the header.

Wrapping Up
Enabling multiple currencies at your Magento 2 stores you prevent cart abandonment, boost customer loyalty, and operate on different markets more effectively. In this tutorial, we’ve described how to enable multiple currencies from the Admin panel. Wish to improve your Magento store even more? Let's discuss your ideas! Feel free to drop us a line at [email protected].
