No Password Login
Description
No Password Login extension enables your customers to securely log in, register and checkout without needing a password. With just a single click which customer gets in their email, customers can now create an account as well as login on the website. The module removes the necessity of remembering passwords to access or create an account on the website.
Module Demo
Compatibility
No Password Login module is compatible with the following Magento platforms:
| Community Edition (Open Source) | Enterprise Edition (Commerce) | Cloud Edition |
|---|---|---|
| 2.3.0 - 2.4.* | 2.3.0 - 2.4.* | 2.3.0 - 2.4.* |
Installation
Installing module using zip file
- Unzip and paste the extension file into your root Magento folder.
- Connect to your server by SSH.
- Go to your Magento root folder.
- To install the extension, perform this command:
php bin/magento setup:upgrade
php bin/magento setup:di:compile
php bin/magento setup:static-content:deploy
Composer installation
If you haven't installed any Aitoc module before, in that case first you will need to add your Aitoc composer repository. Please go through the document to see how you can add composer repository.
To install the module, you will need to run following commands:
composer require aitoc/module-login
php bin/magento setup:upgrade
php bin/magento setup:di:compile
php bin/magento setup:static-content:deploy -f
- To switch the extension on/off, perform these commands:
php bin/magento module:enable Aitoc_Login
php bin/magento module:disable Aitoc_Login
- To update the module, use below command:
composer update aitoc/module-login
Version Compatibility
No Password Login is compatible with the following Magento platforms:
| Community Edition (Open Source) | Enterprise Edition (Commerce) | Cloud Edition |
|---|---|---|
| 2.3.0 - 2.4.* | 2.3.0 - 2.4.* | 2.3.0 - 2.4.* |
Change Log
| Version | Release Date | Changes |
|---|---|---|
| 1.0.0 | Initial Release |
Module Configuration
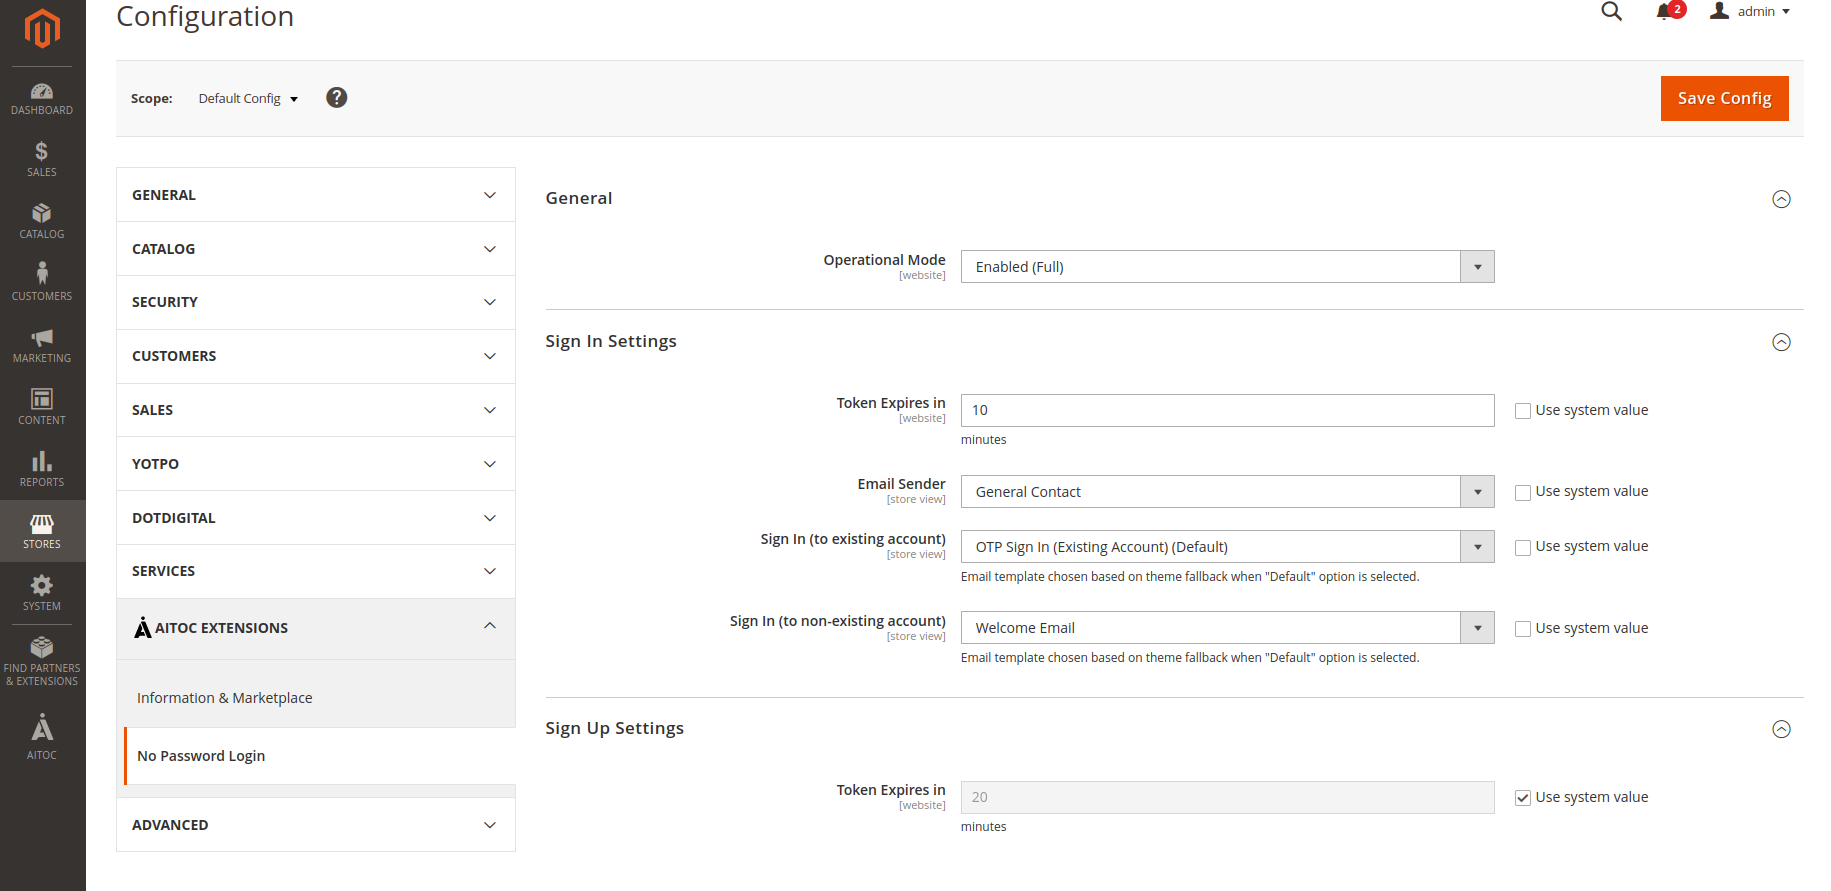
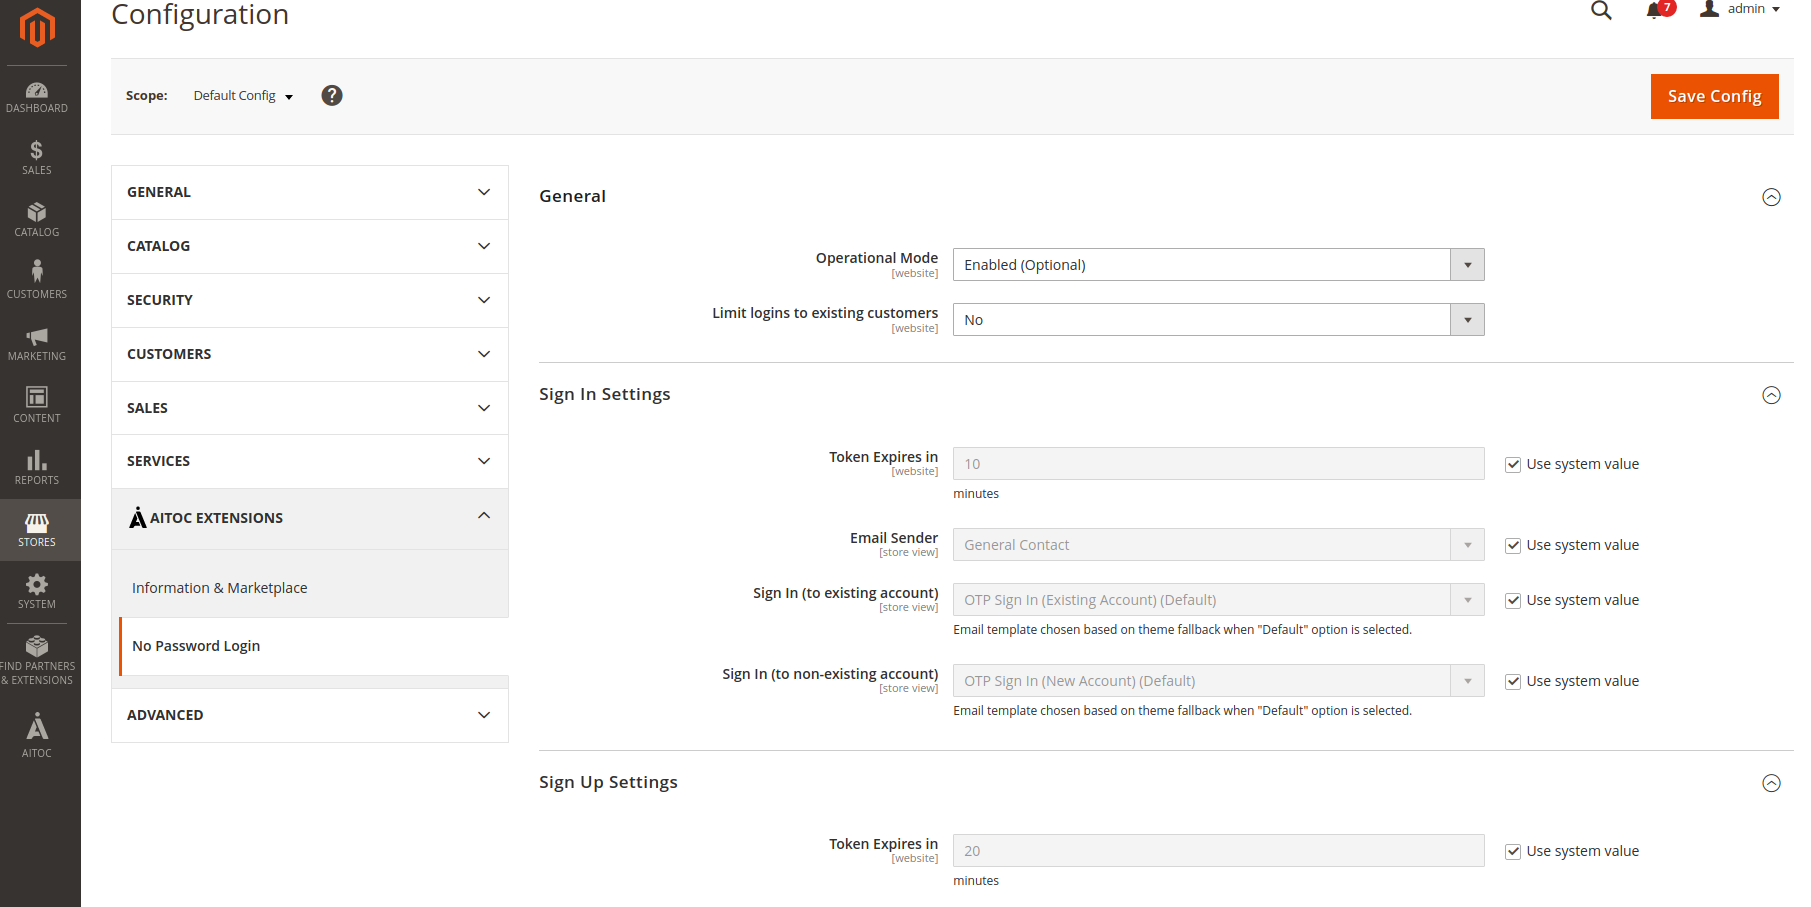
To access the configuration of the module, select Stores → Configuration → AITOC EXTENSIONS → No Password Login from within the admin panel.
Also, you can go to Admin → AITOC → No Password Login → Configuration to access module configuration:
On this workspace you'll find 3 tabs.
General
Operational Mode
Using this configuration field, you can define how the module functionality should work on the front end for customers. There are three options that you can select from:
Disable: If Disable option has been selected, that means the module functionality is disabled, and it won't work.
Enabled (Full): When this option is selected, on the front-end, customer sign-in and sign-up will be done by email link per the module functionality. There won't be any option for the user to enter a password on the Account creation or Sign in Page.
Enabled (Optional): When this option is selected, the native email/password form is still displayed and can be used as normal by the user along with the login by email as per the module functionality.
Limit logins to existing customers
This configuration option restricts the module functionality to existing customers only.
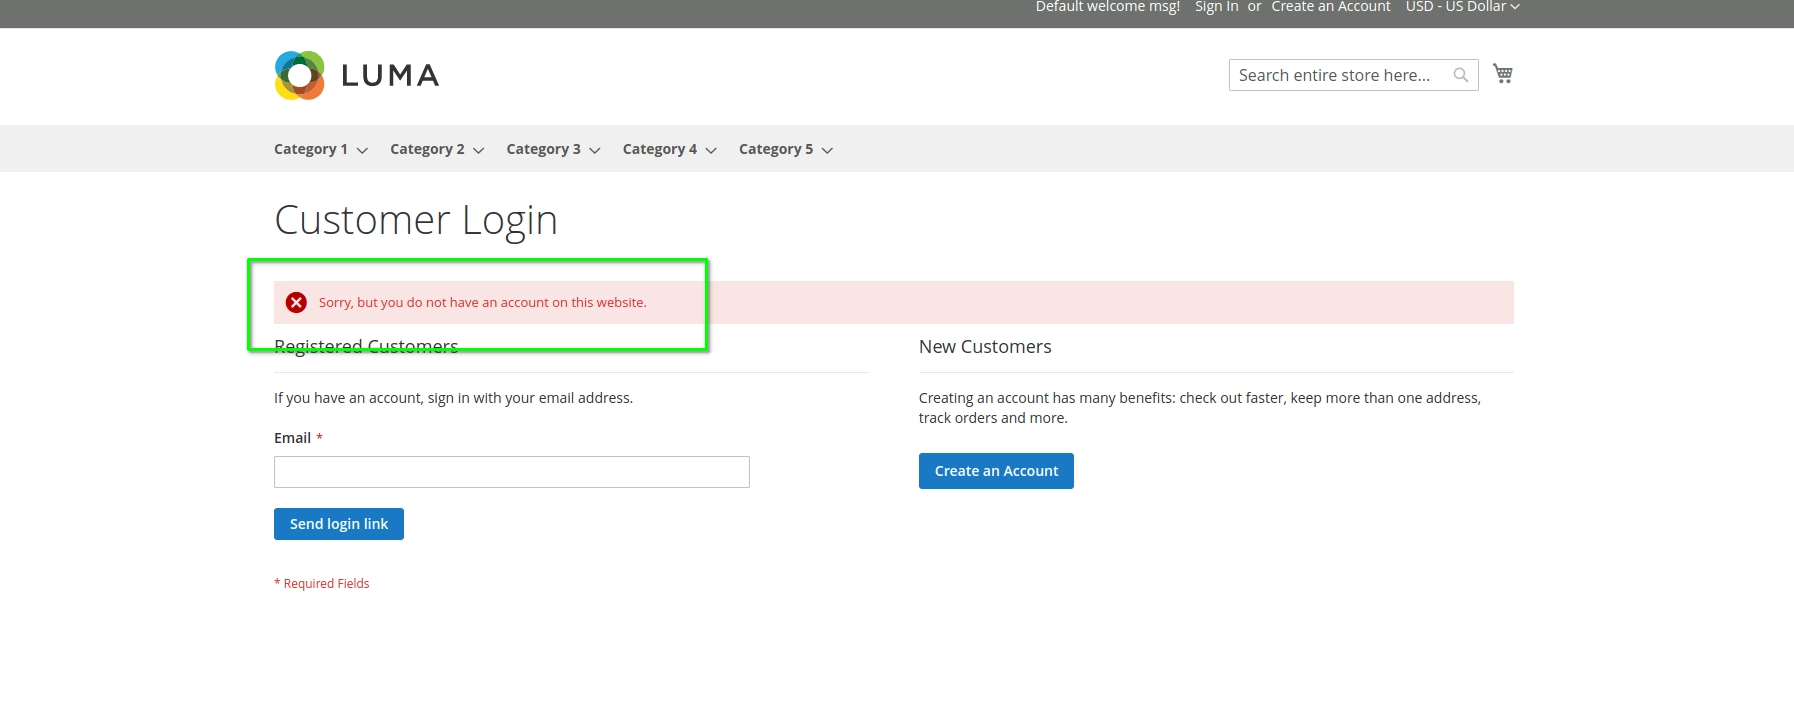
If "Yes" is selected, then only existing customers can log into the site using the module functionality. When anybody tries to log into the site where the email address does not belong to an existing customer, they will receive the message "Sorry, but you do not have an account on this website."
Sign In Setting
The Token Expires in field determines the minutes after which the Sign In link which is sent to the customer expires. By default, the value is set to 10 minutes. You can edit and add numeric value here.
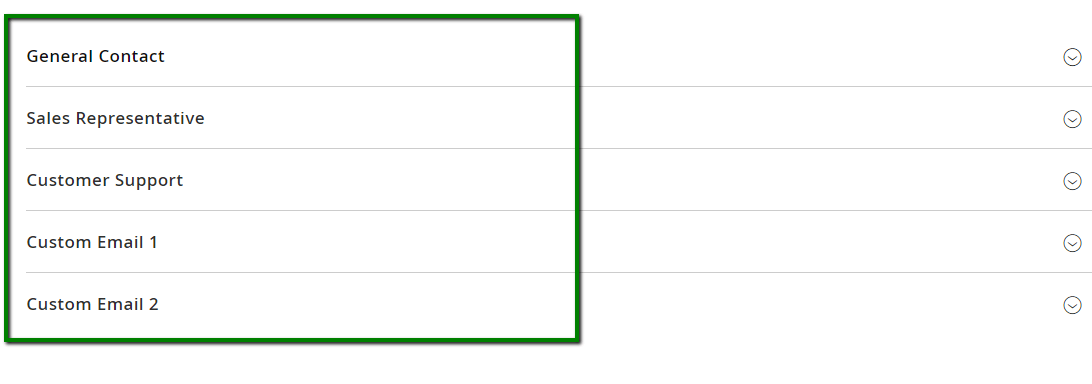
The Email Sender field selects the sender of the email for Sign Up/Sign In emails.
You can add/edit the email address and sender name value from Stores → Configuration → General → Store Email Address:
The Sign In (to existing account) configuration provides the email template which you would like the customer to receive.
The template used here is when there is a login attempt with an email address that already exists as a customer in Magento.
When the module is installed, it will create an email template that will be used in this field by default - which is named OTP Sign In (Existing Account). But you can change the email template and set it as new as you want. Please refer to this section of the manual)
Same configuration is provided for the Sign In (to non-existing account) scenario. The backend administrator can specify the template to be used when an email address does not exist as a customer. The default template is named OTP Sign In (New Account).
Sign Up Setting
The Token Expires in setting determines the minutes after which the Sign-Up link sent to the customer expires. By default, the value is set to 20 minutes. You can edit and add numeric value here.
Default Welcome Email
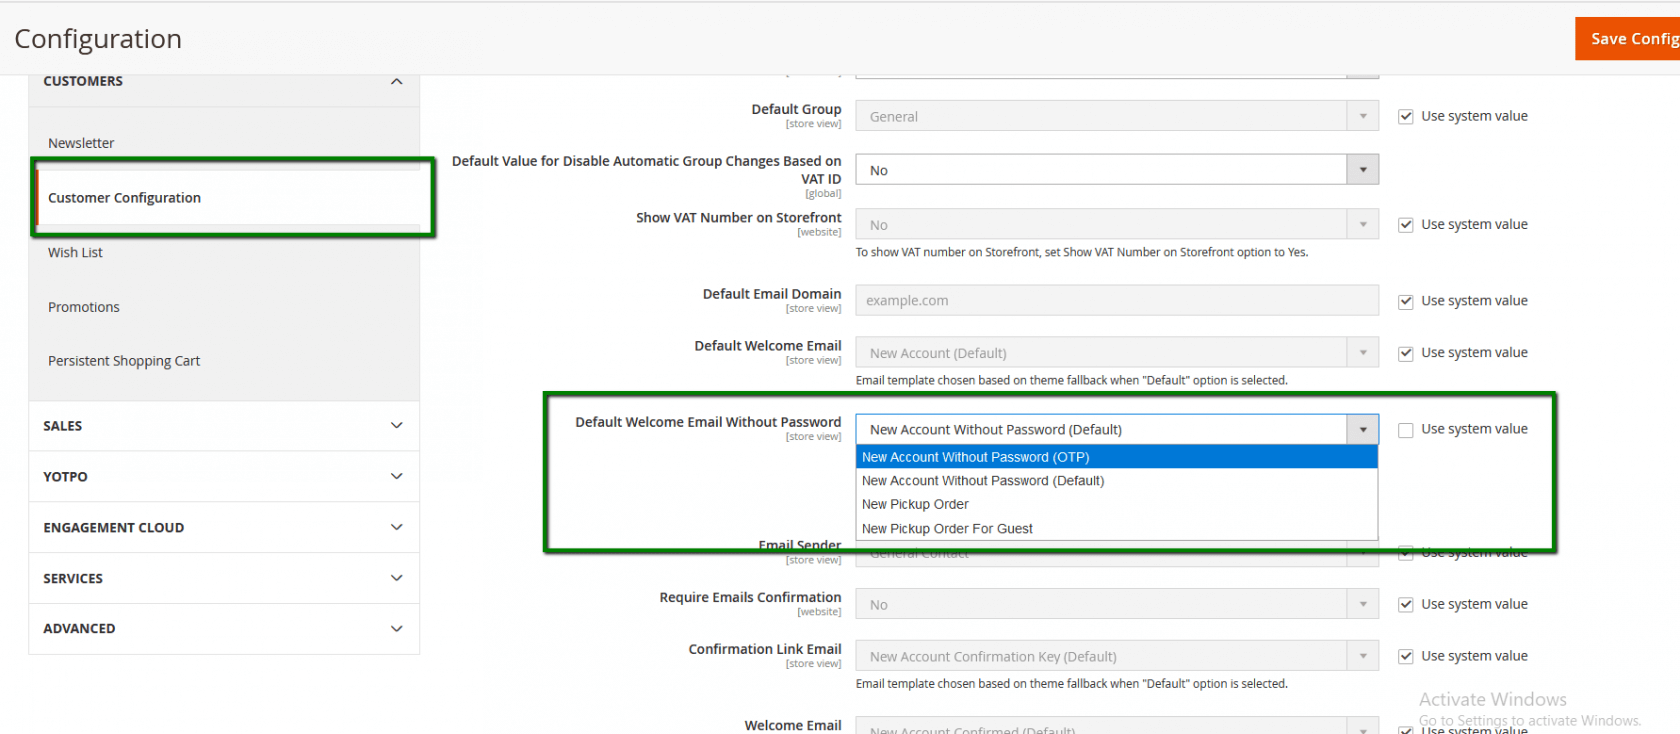
After the Basic Configuration of the extension is finished, you'll also need to update the email template set for New Account. This can be achieved by changing the value for field Default Welcome Email Without Password to New Account Without Password (OTP).
To do this, please go to Stores → Configuration → Customers → Customer Configuration → Create New Account Options → Default Welcome Email Without Password:
Security
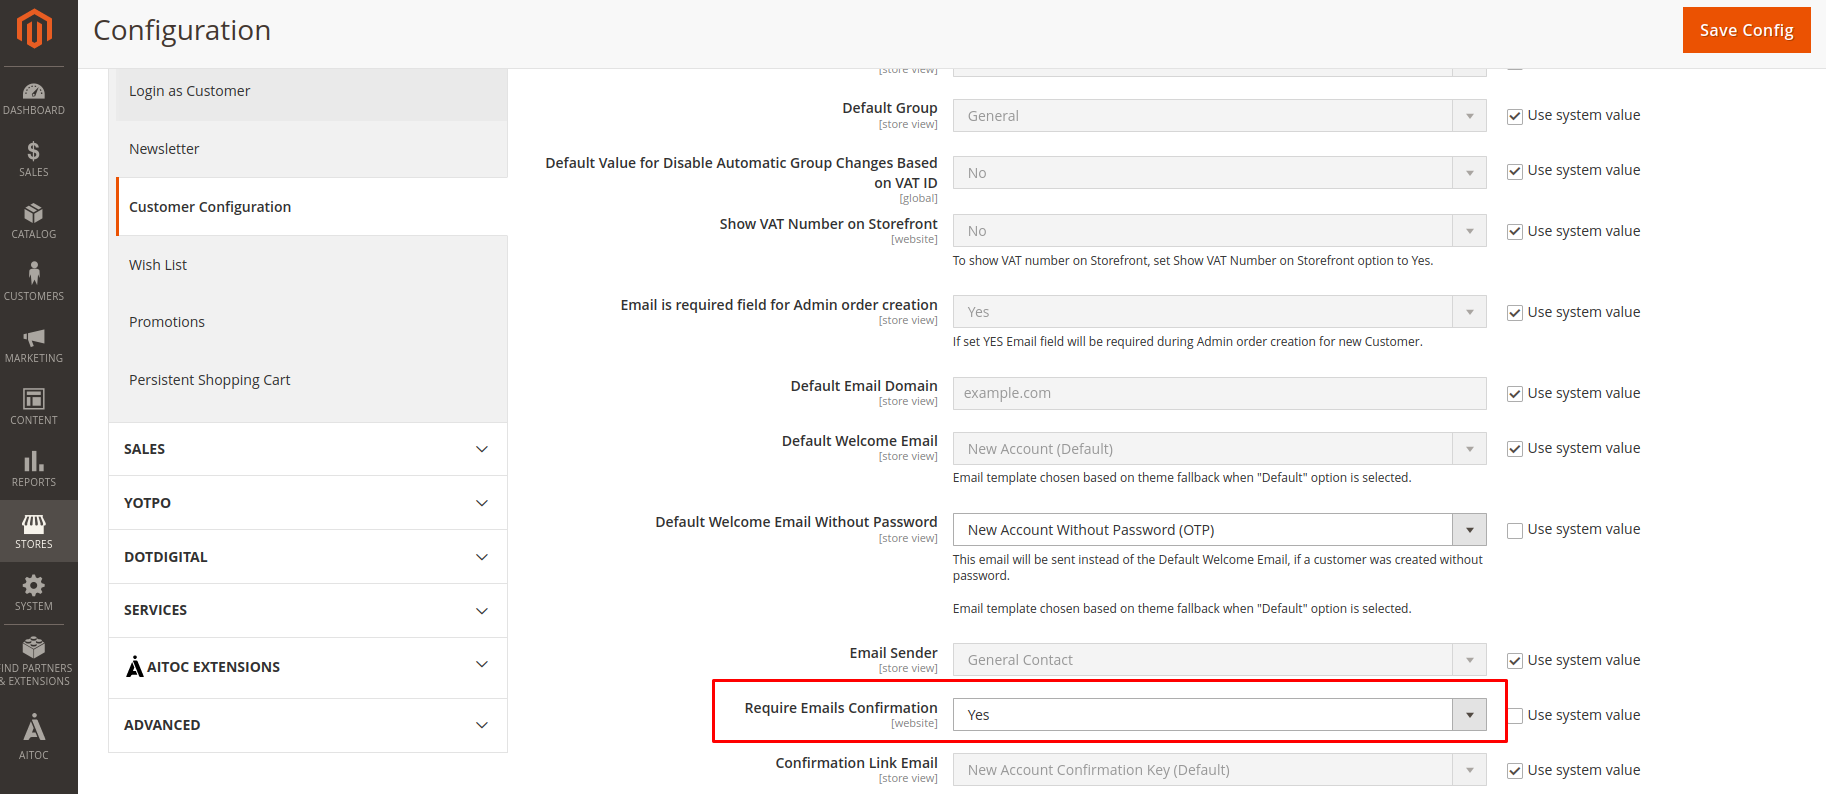
We strongly advise that you also set the Require Emails Confirmation to Yes. If this is set to No, then a user can enter any valid email address that is not already a customer and be immediately logged into the site (potentially placing an order). If this is set to Yes, then it further enforces a login step via email, and so validates that the user has proper access to the email address used.
You can change this setting from Stores > Configuration > Customer > Customer Configuration > Create Account Option > Require Email Confirmation = Yes
Customer Journey
If the module is enabled, then on the front-end, the user will be able to create an account and access site without the need of entering or remembering the password.
Customer Signup
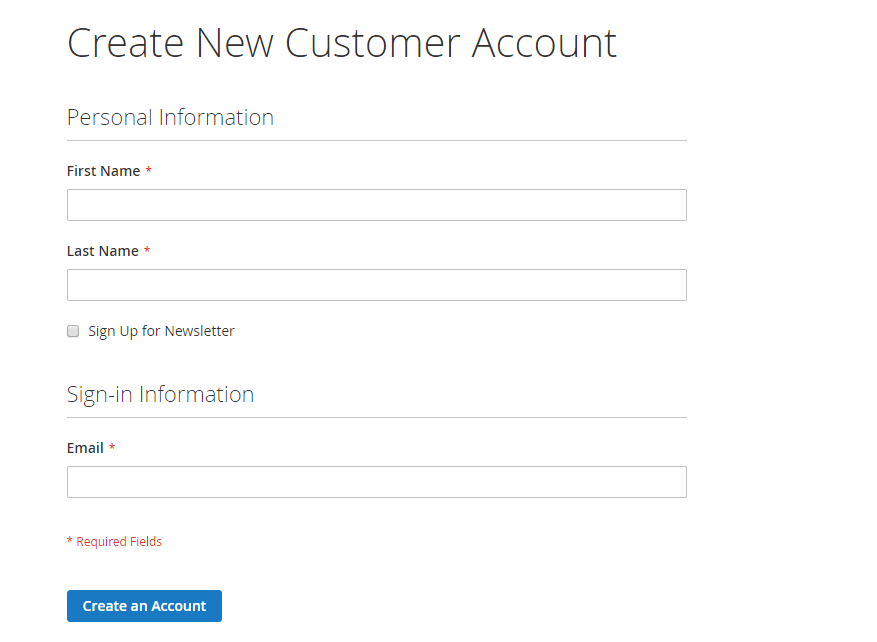
When the user clicks the "Create Account" link on the frontend, a form will appear without any password fields:
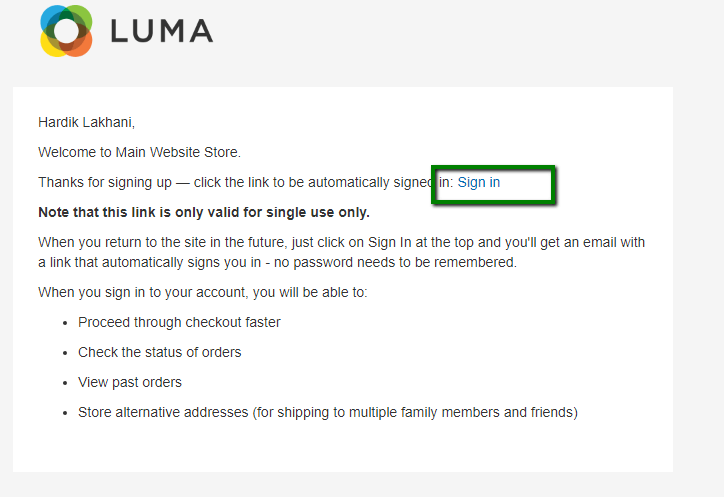
The user needs to enter the required details and to click on the Create an Account button. Once this is done, the user will receive an email:
In the received email, there will be a link. Once the user clicks that link/button, they will be redirected to the site as a registered customer and the user will be logged in. There won't be any need to enter a password.
Token Expiration
By default, the signup link will get expired after 20 min. This can be changed extension's configuration
Customer Sign In
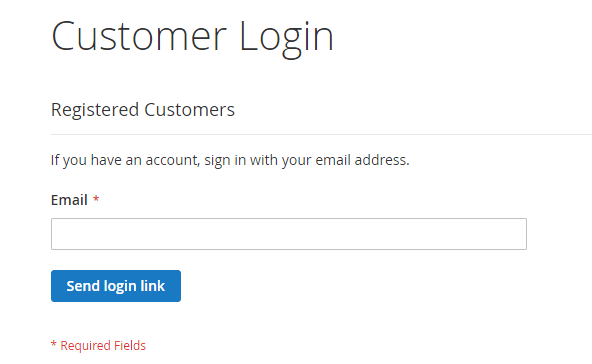
When the user clicks the "Sign In" link on the frontend, a form will appear without any password fields:
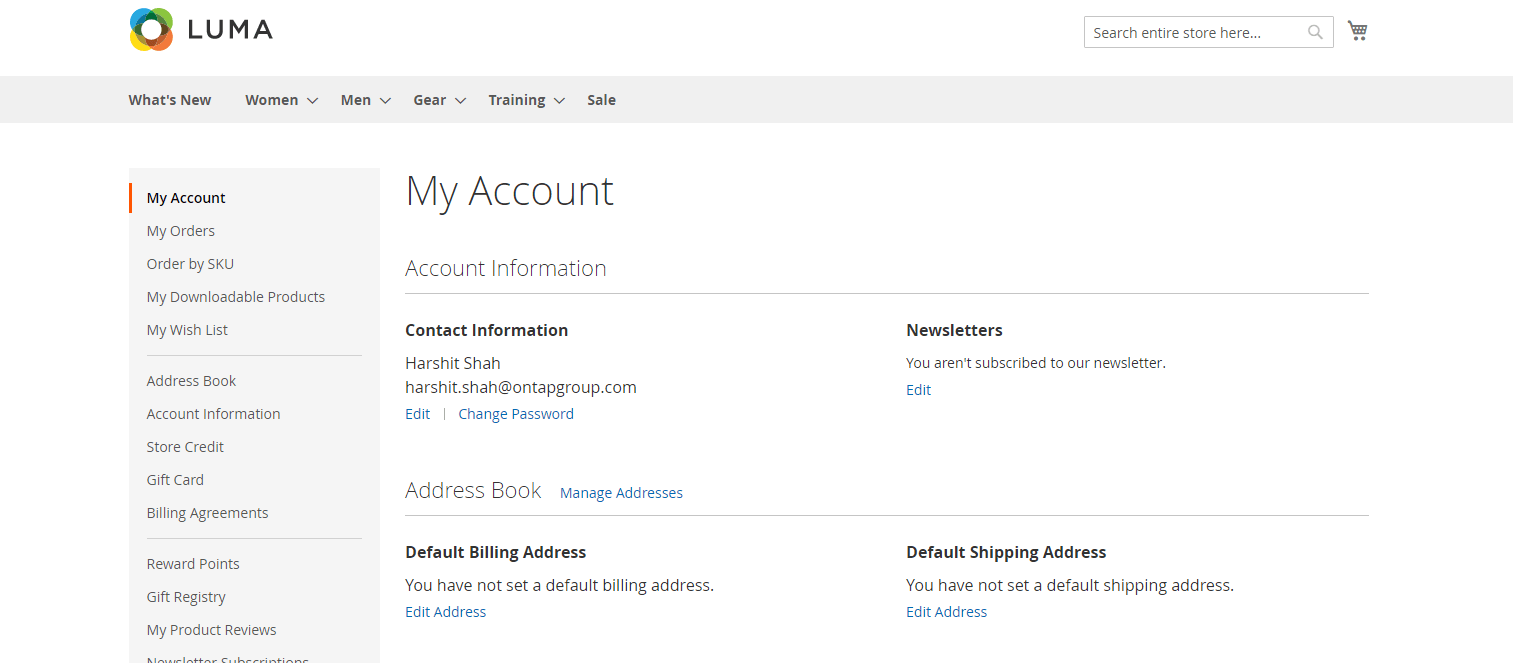
In the received email, there will be a link. Once the user clicks that link/button, they will be redirected to the site as a logged-in customer and My Account Dashboard page will appear:
If the entered email address does not match with any existing customer record, the user will receive a link to Activate their account and then they will be able to create their account as mentioned [here] (#customer-signup).
Token Expiration
By default, the sign in link will expire after 10 min. This can be changed extension's configuration
Email Templates Customization
In order to customise the email templates from the defaults installed, go to Marketing → Communications → Email Templates. Now click on the Add New Template button.
In the Template drop-down select one of the default templates used by this extension.
- New Account Without Password (OTP) is used when a new account is created (assuming you have configured this as per Email Template update in Customer Configuration above)
- OTP Sign In (Existing Account) is used when a login request is made using an email address that already exists as a customer.
- OTP Sign In (New Account) is used when a login request is made using an email address that does not exist as a customer.
These templates contain specific content that must be used in order to ensure that links are generated correctly in the emails. These are as follows:
New Account Without Password (OTP)
The following code should be used to generate the link that enables the customer to complete their account registration.
{{trans
   'Thanks for signing up — click the link to be automatically signed in: <a href="%token_url">Sign in</a>'
   token_url="$this.getUrl($store,'customer/otp/auth/',[_query:[token:$customer.login_token.create().token],_nosid:1])"
   |raw}}
OTP Sign In (Existing Account) / OTP Sign In (New Account)
Notice the use of the $tokenUrl variable .
{{trans
       'Thanks for signing up — use this link to complete the sign up process and be automatically signed in: <a href="%token_url">Activate My Account</a>'

       token_url=$tokenUrl
   |raw}}
For more information regarding editing email templates, please visit the Magento guide
Developer API
An API provides a way for the Magento solution and technical partners to utilise our tokenisation system to generate secure login links as well as validating the links as customers arrive back to the site from email link.
Client side API
AuthenticationManagementInterface API provides methods like:
createTokento create a token from customer email and return aTokenInterface- The
TokenInterfacecan then be used with tokenizeUrl method to generate a secure login link (string), which can be sent to the customer via an email. - Optionally
sendOtpcould be utilised for full login experience (create token + generated link + send email) and redirect the customer to a custom (next) URL eventually.
TokenRepositoryInterface API provides methods like getCustomerTokens and getActiveToken, provide an easy way add validation to your own custom controllers
Server side API
A REST API is available for those developers who want to generate a login URL from an external platform. If the generated URL is then presented to the user and they follow it, they will be logged into Magento.
Required parameters to create a token:
- Customer email
- Store ID
- Token expiry (in minutes)
Create token request
Method: POST
REST URL: /rest/V1/otp/createToken
Request payload (JSON):
{
  "email":"[email protected]",
  "storeId":"1",
  "expiry":5
}
{
  "token":"B6uiladd2569hikvf6vcphh8FixchO..T"
}
The token value can be taken from response payload and used to create the URL that points to OTP auth controller, like:
URL: https://<host>/customer/otp/auth/token/<token>/
Create tokenised authentication URL
If URL generation is not possible manually, then OTP API can be used to create the URL as well. That is mostly useful for websites with multiple stores.
Method: POST
REST URL: /rest/V1/otp/createUrl
Request payload (JSON):
{
  "path":"customer/otp/auth",
  "token":"<token>"
}
Response payload (string):
https://my.magento.site/customer/otp/auth/token/xxxxxxxxxxxx/
Frequently Asked Questions
Which version of Magento is required?
No Password Login has been tested with versions 2.3.0 to 2.4.* inclusive of the following:
- Magento Open Source (Community Edition)
- Magento Commerce (Enterprise Edition)
- Magento Cloud Edition
How much does it cost?
Pricing is the same regardless of which Magento edition you have. However, if you want us to install the module for you, we charge extra for that.
It is licensed per server, so if you have multiple Magento instances, then you’ll need to purchase multiple licenses.
Is it easy to install?
Yes. The extension is delivered as a Magento module that can be very easily installed. The process should only take minutes. Alternatively, we can install it for you.
Is the source code encrypted?
No. The source code is not encrypted so can be modified.
Is support available?
The extension is fully supported by Aitoc. You are eligible for technical support for 90 days from the point of purchase. You can extend this, for additional cost, after it expires to ensure that you continue to receive support and upgrades.
Bug fixes are included within the lifetime of your use of the product regardless of whether you have technical support/product updates. As long as we can replicate the bug in our extension on a clean version of Magento (using a version that is supported by your version of the extension), then we’ll fix it free of charge.
Issues and Support
If you experience any issues with the extension, please do the following:
- Document in detail what has happened.
- Include screenshots and error messages.
- Visit: https://www.aitoc.com/customer/account/create/ and create a new account (if you do not already have one).
- Once logged in, click on SUPPORT, and then the Submit Request button to create a new support ticket.
